
Since completing my 10GHz /P TVTR I have been using it indoors monitoring beacons via rain scatter (RS). Being able to “see” what’s happening on the band is extremely useful. Not only does it help find the signal and peak the dish / horn but it also gives an indication what else might be happening elsewhere on the band while pointing in this direction. You might immediately think, dish antenna, narrow beam width, not the greatest of activity on 10GHz, you’ll be lucky to see anything other than the station you’re peaked on. Well, yes and no. Most of the time that’s probably true but if there’s RS and you’re pointing at the rain cell it’s possible to receive signals from almost any direction, even 180 degrees off your dish heading (back scatter). See here.
If you use one of the popular FT-290 / FT-817/818 as your IF transceiver you really have no real visibilty, you will only be aware of what you’re tuned to, or happen to tune through. What’s needed is some form of panadapter. Many of the newer transceivers on the market today have a built in screen / panadapter. The IC-705 being a prime example and probably one of the main reasons it has become so popular for use with uW transverters.
Up until now I’ve been using a laptop computer with an SDR (RTL Dongle) and SDRConsole as a panadapter. This has worked well but it’s on the large side, and it doesn’t really lend itself to /P operation.
 You can see in the photo above how the laptop sits precariously on top of the TVTR.
I wanted a smaller, more compact and rugged solution. I looked at buying an IC-705 to replace my FT-818 but decided against it. Instead I’d look at replacing the laptop with something smaller.
My TVTR receive lineup uses an LNB frontend into a downconverter. The output from the LNB (618MHz) is split between the downconverter and a port suitable for an SDR unit. So I decided to try a Raspberry Pi (RPi) with a touch display and after some research ordered a RPi 4b with 4GB of memory and a Waveshare 5″ DSI Touch Display. The RPi was configured to run the latest Debian Bookworm OS with desktop UI and GQRX for the SDR software. I really was not sure how good the display would be, but based on my results so far it’s really great in terms of size, touch usability and display quality. How good it will be outdoors in sunlight remains to be seen.
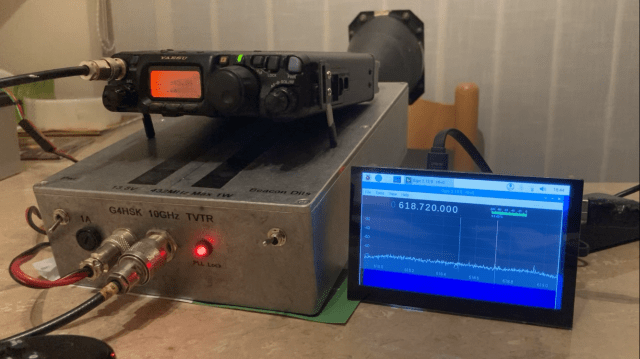
 The photo above shows the initial setup with GQRX configured to display the 10368.00 to 10369.00 segment of the band (618 = 10368MHz). Two signals can be seen on the waterfall, my personal QRPp beacon and GB3PKT beacon on 10368.946. GB3PKT was via RS and 1kHz off frequency due to Doppler shift.
After some further configuration changes within GQRX I now have it showing the actual receive frequency rather than the LNB output frequency.
 As the setup works well and the screen size is more than adequate for my intended use the next stage will be to shoehorn all the hardware into a 160mm x 103mm x 53mm Hammond 1455 series aluminium enclosure. I’m confident that the enclosure will accommodate all the parts, the challenge is going to be the interconnecting cables etc. especially the USB ones. My aim is to have minimal external connectivity, ideally it will be just power, RF input and one USB port for optional devices such as mouse / keyboard / alternative SDR device.
Not having access to a fully equipped workshop means that the metal-bashing side of any project tends to be my least favourite part… so more to follow on this, but first I need to explore ways to start and safely shutdown my new panadapter using a button / toggle switch. 🙂
